Nov 26, 2015

I moved!

I moved!


        The internet didn't swallow me whole ... I moved!!!
        Come and say hello at www.secondopiano.space :-*


Secondo Piano

Ho traslocato!


        Ebbene sìììììììì .... ho traslocato!!!
        Venite a dire ciao a www.secondopiano.space :-*


Secondo Piano

May 14, 2015

Linden #1

Linden #1


Grainline Linden


        In a very uncharacteristic bout of selfless sewing, I made this sweatshirt as a birthday present for my friend Chiara. She is the epitome of “outdoorsiness” so I figured a Linden would be perfect for her. I wanted a strong color (she needs to be “visible” when guiding people down some mountain trail) but all I could find in the shops that I visited was black, grey and white (sigh). It’s a very soft very stretchy (bi-stretch actually) 96% CO, 4% EA fleece therefore I bought white thinking I could dye it. The color I used is called Tulip Red - from Coloreria Italiana. I know, it’s not the most eco-friendly thing in the world to use but it was my only option - sigh again.


Grainline Linden


        I cut a size 4 with no fitting modifications whatsoever. I intended it to be a surprise gift and I could not ask my friend to come in for fitting. Actually this is one of the reasons I chose the Linden. I know the work of Jen from Grainline Studio to be very close to the high-end industrial standards and I expected the fit to be good as is.


Grainline Linden Grainline Linden


        The main concern I had making this sweatshirt was avoiding those ripply, stretched seams that I abhor and were a real possibility given the stretchiness of the fabric and the on bias seam of the raglan sleeve. I closed the seams with my overlocker and then topstitched with my sewing machine and a decorative stretch stitch (number 14 on my Bernina). During the execution of this stitch the feed dogs go back and forth and can stretch the fabric so I used the walking foot and had to fiddle quite a bit with the presser foot pressure (thank god for that option).


Linden Sweatshirt


        Adding contrast trims was a stylistic decision that posed it’s own set of problems: of course I had no suitable ribbing (the one I did have was rather thick and stiff and using it would have resulted in really bulky seams). I used instead some equally stretchy grey sweatshirt fleece on crosswise direction.


Linden Sweatshirt


        I tried a different approach to constructing this sweatshirt. I first closed the raglan seams and topstitched them. I attached the unfolded bands (I did widened them by 1in. total at the neck and 2in. total at hem and cuffs - if memory serves correctly) - fold line pressed. I then joined the side seams and topstitched at the base of the collar band, hem and cuffs catching the open edge under the serged seam allowances. This method reduced bulk by one layer but required lots of pins and curse words.
        I knew that not using ribbing at the neck meant possible deformation with wear resulting in one of those highly unaesthetic collar bands that flare and gape and would not lie flat so I reinforced the top of the band with clear elastic. It is sewn on the inside along the fold line. The triangle it is not only a decoration but also reinforces the front of the neckline that as we know, tends to stretch out of shape. What IS a mostly decorative element … is the drawstring a bit a là dsquared.


Linden Sweatshirt


        This post is called Linden #1 because I anticipate a Linden #2, #3 …. #n in my wardrobe.
        I love sweatshirts. This Linden came together beautifully in about 5 hours and I am a really relaxed sewer. I like to take my time and enjoy the process (of course I maybe would have enjoyed it a bit more if it was for myself ;), although I got to wear it to take the pictures - I am such a selfish one).
        What about you? Do you take your time or maybe get into that maker’s frenzy dying to see your project finished?


Linden Sweatshirt


Thank you for visiting. I would love to hear your opinion.

Linden #1


Linden Sweatshirt


        Lo so, suona strano detto da me … ma ho cucito qualcosa per qualcun’altra!!! - la mia amica, Chiara. Essendo Chiara l’icona della vita all’aperto ho pensato che una felpa Linden sarebbe stata perfetta per lei. Ho voluto un colore acceso, che fosse ben visibile quando accompagna gruppi sui sentieri di montagna. Sfortunatamente nei negozi tutto quello che ho trovato era nero, grigio o bianco. Ho scelto una felpa molto elastica (anzi bi-elastica), 96% CO, 4%EA bianca, pensando di tingerla. Per la tintura ho usato il Rosso Tulipano della Coloreria Italiana - lo so no è una scelta veramente eco-friendly ma unica mia opzione. Conoscete per caso modi migliori per tingere tessuto in casa?


Felpa Linden


        Ho tagliato una misura 4 e non ho fato alcuna modifica/alterazione. Per un regalo sorpresa non poi veramente chiamare a prove. Ed è questa un’altra ragione per la quale ho scelto il Linden. So che il lavoro di Jen di Grainline Studio è molto vicino agli standard sartoriali industriali di alto livello perciò mi aspettavo una buona vestibilità senza modifiche.


Felpa Linden Felpa Linden


        La mia preoccupazione principale durante il confezionamento è stata di evitare le cuciture tirate che producono quelle onde che detesto - una vera possibilità considerando l’elasticità del tessuto e della cucitura sullo sbieco delle maniche raglan. Ho assemblato con la tagliacuci e poi ho fatto le impunture con la machina da cucire e un punto elastico decorativo (numero 14 della mia Bernina). Durante l’esecuzione di questo punto le griffe di trasporto vanno avanti e indietro e possono tirare il tessuto dunque ho usato un piedino doppio trasporto e regolato la pressione del piedino (svariati tentativi) - grazie a Dio la mia machina da la possibilità.


Felpa Linden


        Aggiungere le finiture a contrasto è stata una decisione di styling che ha posto un set di problemi tutto suo. Ovviamente non avevo il bordo a costine adatto ma uno troppo spesso e troppo rigido che avrebbe reso le cuciture troppo pesanti. Ho usato invece, della felpa grigia ugualmente elastica in direzione trasversale.


Grainline Studio Linden


        Ho voluto provare un metodo di confezionamento un po' diverso. Prima ho chiuso il raglan e ho fatto le impunture. Ho aggiunto i bordini non piegati - (li ho allargati di 2.5cm totali al collo e 5cm totali a polsi e fondo - se mi ricordo bene) - dopo aver precedentemente creato la linea di piegatura con il ferro da stiro. Ho eseguito le cuciture laterali e poi le impunture dei bordi prendendo dentro, sotto i margini fatti con la tagliacuci anche i margini liberi delle finiture. Ho ridotto così l’ingombro di un strato ma ho sprecato tante parolacce e spilli.
        Sapevo che non usando le costine attorno al collo, c’era la possibilità che portando la felpa lo scollo perdesse elasticità e si sformasse in quel modo odioso e non stesse più piatto. Per ovviare ho cucito dentro il collo, elastico in silicone trasparente. Il triangolo non e soltanto un elemento decorativo ma serve anche da rinforzo per lo scollo. Il cordoncino a là dsquared invece è puramente decorativo.


Grainline Studio Linden


        Questo post si chiama Linden #1 perché prevedo la nascita di un Linden #2, #3 … #n.
        Adoro le felpe e questa si e praticamente confezionata da sola, senza nessun intoppo in circa 5 ore - ed io sono molto rilassata quando cucio. Mi piace andare piano e godermi il processo (forse avrei goduto un po di più se la felpa fosse rimasta nel mio armadio ;) anche se l’ho indossata poi per le foto - ahhhh penso solo a me stessa).
        E voi? Quando cucite vi piace prendervela con calma oppure vi sale quella sorta di delirio che ti spinge a voler vedere il progetto compiuto il prima possibile?


Linden Sweatshirt


Grazie della visita. Mi piacerebbe moltissimo sentire la vostra opinione.

Apr 9, 2015

A Could-be-Neoprene Long Jacket

A Could-be-Neoprene Long Jacket


        What is neoprene anyway?
It's a synthetic rubber. In its non-foam form is very elastic and as a foam laminated onto knit jersey offers good insulation. The laminated neoprene is usually the one used by the apparel industry and comes in various thicknesses: 1.5, 3 and 6 mm being the most common especially in sports gear like diving dry and wet suits. Because my fiancé owns a couple of said suits I got to study the fabric and figured it should be interesting enough as a long jacket. So with the 3mm sample at hand I begun drawing one. Because of its nature, neoprene does not press so it had to be without darts yet I wasn't ready to go for the boxy cut. It had to have some shaping. Princess seams were the obvious choice - topstitching was the next, in order to force the seams to lay flat.. Being my first time with such a fabric I wanted to keep things fairly simple - avoid layering and no complex closures and collars. The two piece sleeve was the exception to the keep-it-simple thing. I think a rigid material sort of requires a two piece sleeve. Finally I chose the empire waist silhouette because ... well ... I like it.

        The good
        I love the colour ... This acid green shade was the main selling point for this fabric I got from Supercut. I like the silhouette - I think I achieved a good balance between sporty and cute. And lastly allow me to pat myself on the back for drafting the sleeve. My first time drafting a two piece sleeve and I did a bang up job if I may say so.


        The bad
        Not all neoprenes are equal. Little did I know some neoprenes are not neoprenes but neoprene lookalikes. This one is more of a bonded jersey. Maybe the bonding was done using an almost invisible layer of neoprene or maybe it's another bonding agent… I do not know. Fact is there is no elasticity. If you pull the fabric you will literally hear the bonding layer crack and the fabric will deform - zero recovery. It is also very thin so it required interfacing... I should have used a heavy non stretch fusible interface (to avoid the above deforming) but I didn't. Why? Momentary lapse in judgement. What about insulation you say. None. Wind will pass right through it. I did not try water... I'm afraid to. To make it a little warmer I thought of using polar fleece as lining ... and because it's polar fleece why not go color crazy !?. In theory using polar fleece is an ok idea; in practice in this case, it needed a stiffer shell. The problem is that it hangs on the clothes and interferes a little too much with the drape in movement.


        Looking back now I think the fabric would have been better suited for a mid-layer kind of garment like a cardigan or something.

        The pictures


        I must admit for a while there I considered taking it all apart, re-interfacing it and maybe changing the lining but this time in my personal internal battle between laziness and OCD ... laziness won. I had also a small push from some of the gals at the Italian Sewing Meet-up (btw fantastic experience!!!) ... they convinced me it would be difficult and messy. Meanwhile I've been wearing it (for the past almost two months now - it is light and comfy and easy to carry around in trains for instance) and the window I had to modify it closed on me. I'm thinking when I'll get my hands on some sports grade neoprene I'll just remake this ... or maybe not.
        What would you do?


        As per my usual I'm including the pattern I used; again for scientific reasons. It's the draft of the shell with no seam allowances included. Use with caution... it is not a standard size but fitted to my body. You will be able to download it until my next post.... whenever that may be as lately I've been incredibly busy with school and work and some other general life stuff.

        Ps. I am of course wearing it with my Turias :)
        Update: zipper closure detail on Instagram


Thank you for visiting. I would love to hear your opinion.

Giacca in Neoprene(adiacente)


        Cos'è il neoprene comunque?
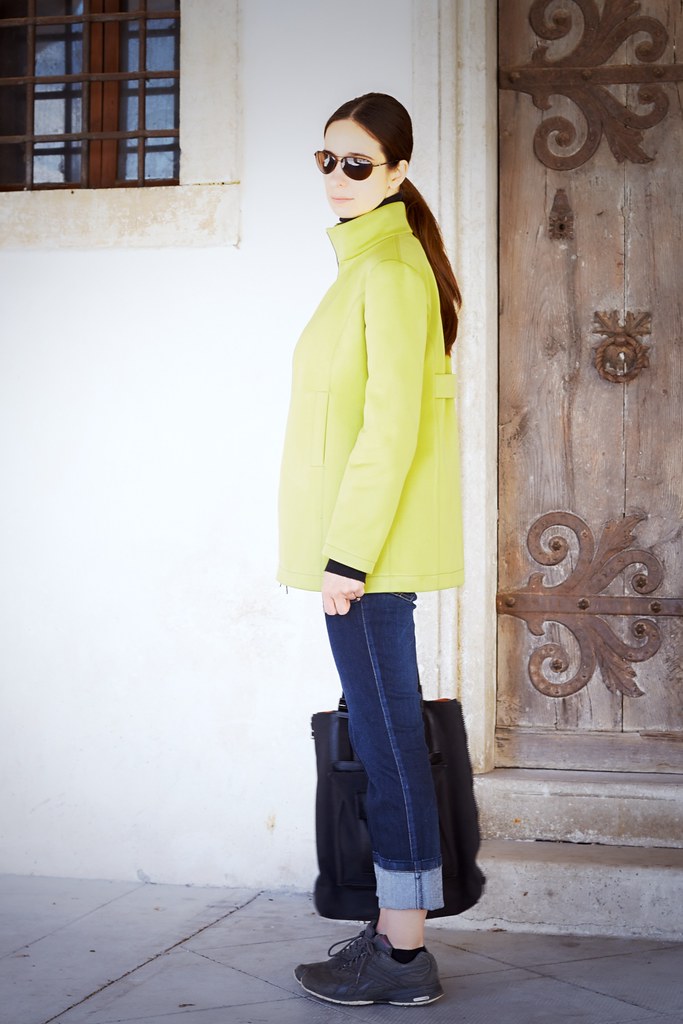
        E’ una gomma sintetica. Nella sua forma colata è molto elastica mentre come schiuma laminata su maglia è un ottimo isolante. L'industria tessile impiega solitamente il neoprene laminato sopratutto nei spessori 1.5, 3 e 6mm: i più comunemente usati per l'abbigliamento/attrezzatura sportiva come le mute da sub. Visto che il mio fidanzato ne possiede un paio ho avuto la possibilità di guardare bene, tirare, piegare il tessuto/materiale e concluso che si mi piacerebbe una giacca. Con il campione da 3mm in mano ho preso a disegnarne una. Per sua natura il neoprene non si stira perciò niente riprese. Non volendo un taglio squadrato la scelta ovvia è stata il taglio princesse. Per appiattire le cuciture ho scelto di impuntare tutto … o comunque il possibile. Dato che era la prima volta che utilizzavo tale materiale, il piano era di provare a semplificare il più possibile le cose - evitare spessori eccessivi e niente chiusure o colletti complessi. La manica a due pezzi è stata l'eccezione forzata diciamo. Penso che un tessuto rigido richieda solitamente una manica a due pezzi. Finalmente ho scelto la silhouette impero ... perché è una tra le mie preferite.

        Mi piace
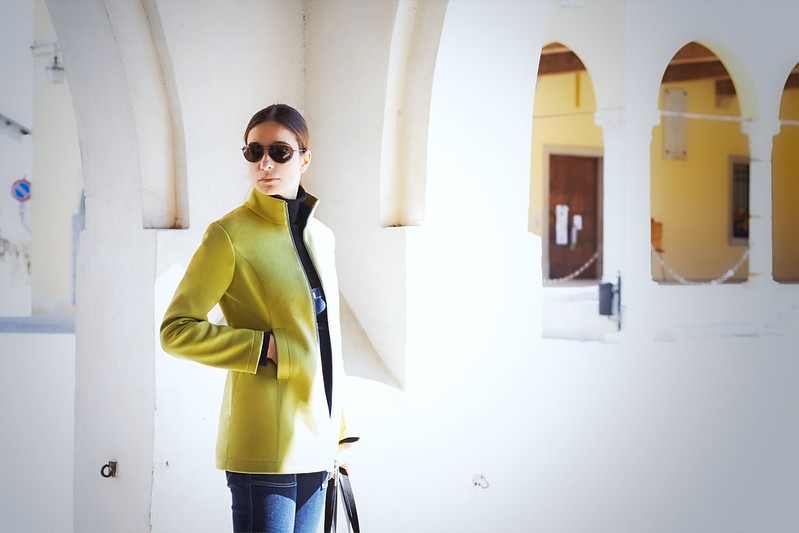
        Il colore ... questo verde acido è stato la ragione principale per la quale ho acquistato questo tessuto da Supercut. Mi piace anche la silhouette - penso di aver trovato un buon rapporto tra sportivo e carino. Per finire permettetemi di darmi da sola una pacca sulla spalla per il progetto della manica. Questo è stato il mio primo progetto di manica a due pezzi e penso di aver fatto un ottimo lavoro - se posso dirlo.


        Non mi piace
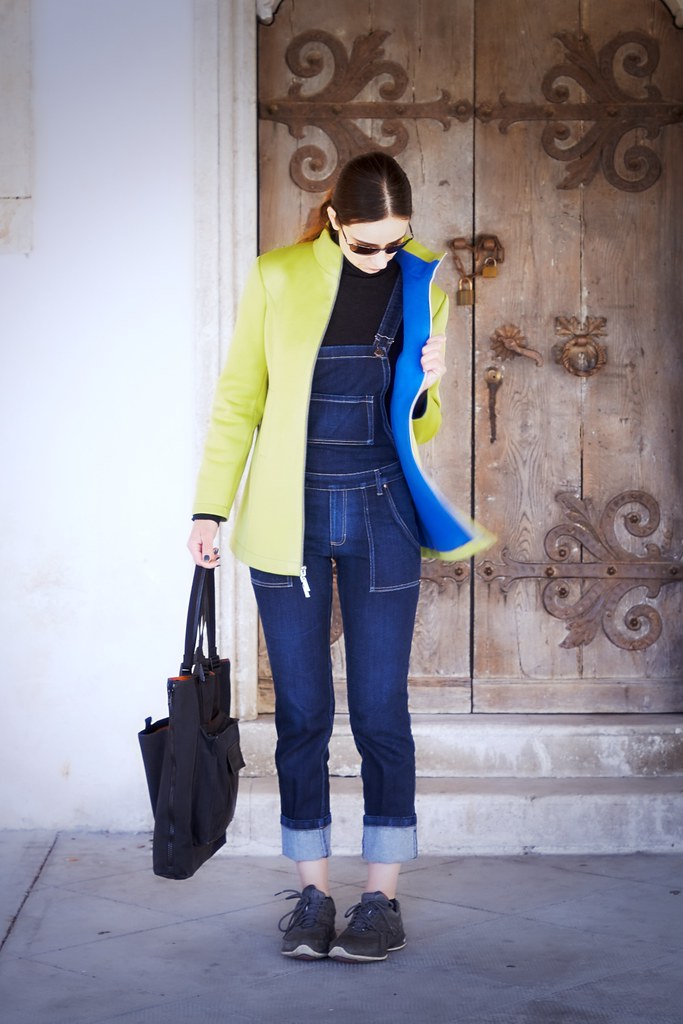
        Non tutto il neoprene è uguale. Poco ne sapevo ma alcuni tessuti neoprene non sono neoprene ma sembrano neoprene. Questo qui è più un accoppiato in jersey. Forse il collante è uno strato sottilissimo di neoprene o forse qualcos’altro, non lo so. Il fatto è che che non c’è elasticità. Se lo si tira si può letteralmente sentire lo strato di collante crepare ed il tessuto subirà una deformazione permanente. E’ anche molto sottile quindi ho dovuto usare della fliselina per provare a irrigidirlo e stabilizzarlo … La ragione per la quale ho usato una fliselina elastica sinceramente mi sfugge … devo aver avuto spento il cervello. Per quel che riguarda l’isolamento … beh … non c’e isolamento. Il vento ci passa a traverso come se niente fosse. Per farla diventare un po più calda ho usato una fodera in pile … e visto che parliamo di pile perché non sbizzarrirsi con il colore!? In teoria utilizzare del pile all’interno è un’idea ok ma in questo caso e visto che il tessuto della scocca non è molto rigido, la fodera attaccandosi ai vestiti sotto interferisce con il drappeggio sopratutto in movimento.


        In retrospettiva penso questo tessuto sarebbe stato meglio adatto per uno strato intermedio tipo un cardigan o qualcos’altro.

        Le foto


        Devo ammettere che per un pezzo ho preso in considerazione l’idea di smontare tutto riattaccare della fliselina rigida e rifoderare con un altro tipo di tessuto magari, ma in questo caso, nella mia personale battaglia interna tra DOC (intesso come disturbo ossessivo-compulsivo) e pigrizia ha vinto la pigrizia. Ho avuto anche un piccolo aiutino a decidere da parte di alcune tra le ragazze all’
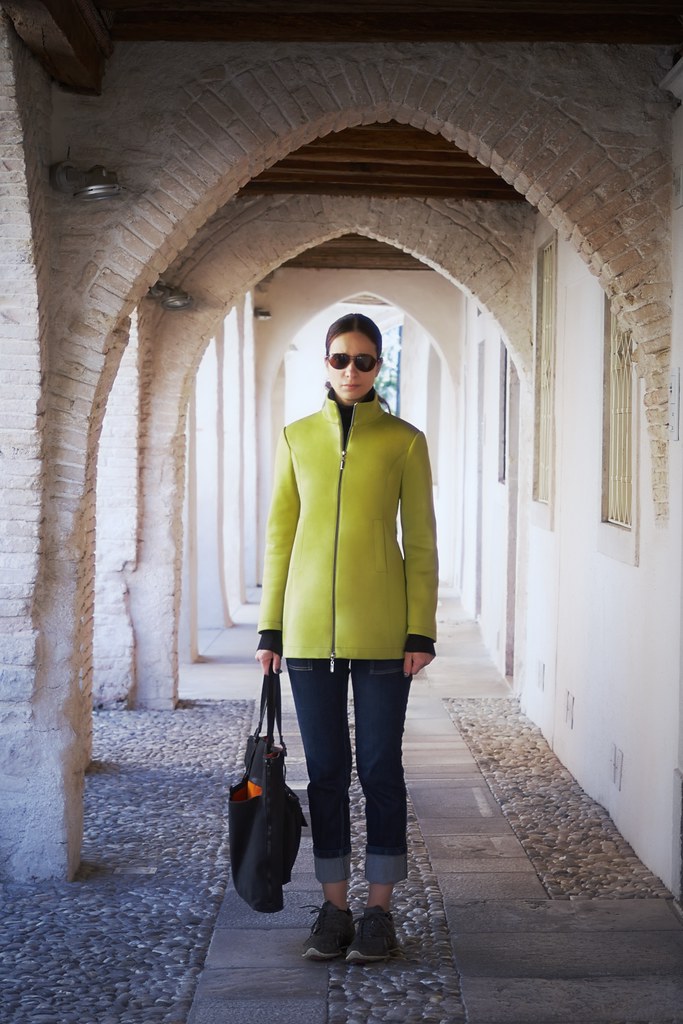
Incontro di Cucito (a proposito, fantastica esperienza!!!) che mi hanno suggerito che sarebbe stato un lavoraccio con dubbi risultati poi. Nel fra tempo e negli ultimi due mesi all’incirca l’ho comunque indossata parecchio - è leggera, confortevole e facile da portare in giro sul treno per esempio - e la finestra che avevo per modificarla penso si sia chiusa. Forse un giorno quando sarò riuscita a mettere le mani su del neoprene neoprene come quello delle mute la rifarò semplicemente … o forse no.
        Voi cosa fareste?


        Come al solito includo il cartamodello che ho usato; come sempre per ragioni scientifiche. E’ la bozza (il draft) della scocca senza margini di cucitura. Usare con cautela … non è una misura standard ma è adattata al mio corpo. Potrà essere scaricato fino alla pubblicazione del mio prossimo post - una settimana, un mese chissà … ultimamente sono stata super impegnata tra scuola, lavoro e vita in generale.

        Ps. La sto ovviamente indossando con la salopette Turia :)
        Update: dettaglio della chiusura lampo su Instagram


Grazie della visita. Mi piacerebbe moltissimo sentire la vostra opinione.

Feb 27, 2015

Bruyère

Bruyère


        I’m wearing a top hat to distract you from the badly matching lines and the moiré!


Bruyere Shirt


        This is the Deer&Doe Bruyère Shirt in a mishmash of sizes and bearing so many alterations that the original pattern got buried so deep it would take a shovel to dig it out. Why? Because the way my body is built is soooooo far away from the Deer&Doe “standard”. This pattern is not a generic one and when I say generic I mean based on some generic block like the ones straight out of the pattern cutting books. This pattern has been fitted to a specific body type and I think this proves its “originality” - and lately has been some talk about the originality of independent patterns.


Bruyere Shirt Bruyere Shirt


        Still… I love the design of the Bruyère so much that I went ahead and ploughed my way through a bust adjustment from the original D cup to my almost B cup (through both bust darts). I lengthened a lot the bodice - when Eléonore, the designer, says 168cm height it IS 168cm height. As a base size I cut the a 36. Although I cut the neckline at a 34 I had to reduce it further by 1cm - and it’s still not enough. I like to be able to close my shirts to the last button if I feel like.


Deer Doe Bruyere Shirt


        I added ca. 1cm to the shoulder length also and about 1.5 cm to the sleeve cap. Because I have no intention of wearing this shirt to do manual labour or run track I reduced the ease at the back a lot and I mean a lot. The same with the bicep girth and I also raised the armhole. Yeah I know I had to do quite a bit but this is how much I love the design.


Deer Doe Bruyere Shirt


        The fabric is a small houndstooth in a slightly stretchy wool blend. Not much but enough to complicate things especially when time came to assemble the belt and the button placket.
        The first placket I made I did not pay very much attention to the fabric pattern and I ended up with two adjacent black lines - very disturbing visually and some vertical shifting. I knew then I had to do it by hand. So I got comfortable turned the tv on, took a deep breath and started doing one of the things I like less: hand sewing. The second placket was alright but I did not like the buttons. Decided that I wanted a less intrusive closure - if possible invisible. For the third I used sew on snaps. It resulted too bulky with the thickness of the snaps and there was also some gapping. It just wouldn’t lie flat! For the final one I crossed my fingers and used sew in snaps. This instagram pic demonstrates the construction. If you want to know more just ask :) !


Chemise Bruyere


Chemise Bruyere


Chemise Bruyere


        I am pleased with the result although as you can see the back is still to long.
        I’m sorry we had really bad weather lately and I couldn't photograph it outside and the inside pictures are not at all good - they don’t do it justice.
        btw I am wearing my latest (i. e. second ;) pair of Ginger Jeans!

        And because here in Italy American Horror Story: Freak Show is about to premiere I leave you with my creepiest grin ad also with the proof the neckline opening is still too big.


Chemise Bruyere


Sasha


Thank you for visiting. I would love to hear your opinion.

Bruyère


        Sto indossando un cilindro nel vano tentativo di distogliere la vostra attenzione dalle linee che combaciano male e dalla moiré nelle foto!


Chemise Bruyere


        Questa è la Camicia Bruyère di Deer&Doe in un mix di taglie e con sopra talmente tante alterazioni che per scovare il cartamodello originale servirebbe una pala. Perché? Perché la mia corporatura è moooolto diversa dallo "standard" Deer&Doe. Questo cartamodello non è uno generico e quando dico generico intendo basato su qualche blocco base generico come quelli nei libri di modellistica. Questo cartamodello è stato adattato per una corporatura ben precisa e penso questo ne provi la "originalità" - ultimamente ci sono state un po' di discussioni sull'originalità dei cartamodelli indipendenti.


Camicia Bruyere Camicia Bruyere


        Nonostante le differenze in conformazione tra me è la modella di Deer&Doe il design di questo cartamodello mi piaceva (e mi piace) così tanto che ho deciso di affrontare tutte le modifiche da fare. Anzitutto ridurre il busto da una coppa D a una quasi B. Ho dovuto inoltre allungare di parecchio il corpetto - quando Eléonore, la designer, dice 168cm di altezza, sono 168 cm di altezza. Come misura base ho tagliato una 36. Anche se lo scollo l'ho tagliato in misura 34 l'ho comunque dovuto ridurre ancora di c. 1cm ed ancora non basta. Mi piace poter indossare le mie camicie abbottonate fino all'ultimo bottone se mi va.


Camicia Bruyere


        Ho aggiunto 1cm alla lunghezza spalla e 1,5cm al colmo manica. Perché non ho alcuna intenzione di indossare questa camicia per fare lavori di manovalanza o per andare a correre ho ridotto la vestibilità nella schiena di c. 3cm. Lo stesso per la manica all'altezza bicipite. Ho anche alzato l'incavo. Si lo so ho dovuto fare parecchie modifiche - così tanto mi piace questo design.


Camicia Bruyere


        Il tessuto è un pied-de-poule piccolo in un misto lana un po' elasticizzato. Non molto, quanto basta per complicare le cose quando si è trattato di confezionare la cintura ed il cannoncino.
        Quando ho cucito il primo cannoncino non sono stata particolarmente attenta alla distribuzione delle linee perciò sono finita con due linee nere adiacenti - visivamente molto fastidioso, e qualche slittamento verticale del pattern. Ho capito che lo dovevo farlo a mano. Mi sono mesa comoda, ho acceso la Tv, fatto un bel respiro ed iniziato con la cosa che meno mi piace in assoluto: cucire a mano. Il secondo cannoncino e venuto ok ma non mi piacevano i bottoni. Ho deciso che preferivo una chiusura con un minore impatto, possibilmente invisibile. Per il terzo perciò ho usato dei bottoni a pressione del tipo "sew on" che però creavano troppo spessore. Dunque arriviamo al quarto cannoncino per il quale ho utilizzato sempre dei bottoni a pressione sta volta del tipo "sew in" . Questa immagine instagram ne dimostra la costruzione. Se avete delle altre domande chiedete :) !


Bruyere Shirt


Bruyere Shirt


Bruyere Shirt


        Sono contenta del risultato anche se come si puo vedere la schiena e ancora troppo lunga.
        Mi dispiace se a causa del maltempo, che i giorni passati si è abbattuto sulla mia zona, non sono riuscita a fotografarla fuori è le immagini in interno non sono chissà che.
        a proposito sto indossando il mio secondo paio di Ginger Jeans!

        Visto che in Italia American Horror Story: Freak Show andrà in prima questi giorni, vi lascio con il mio più raccapricciante sogghigno e la prova che lo scollo è ancora troppo grande.


Deer Doe Bruyere Shirt


Sasha


Grazie della visita. Mi piacerebbe moltissimo sentire la vostra opinione.

Google+